If you are a homelabber or are in charge of a bunch of physical servers I'm sure you are very security cautious. You wouldn't keep an SSH server up that allows root via password (or at all) and you won't even think about port-forwarding insecure protocols like FTP to your blinkenlights.
But have you ever thought about a defense strategy against people taking your devices from you? How could you secure your data from burglars or police raids?
Encryption, obviously!
Not just since Snowden, we know that the only working solution for protecting data is encryption. Be it as transport encryption (SSH/HTTPS/Wireguard) or file encryption, the possible solutions are broad and the benefits great but what's working great for your home computer and phone, has a large flaw for servers:
Do I need to enter a password on every device after a power outage or reboot?
This would be less than ideal (even though most secure). If we want encrypted servers we need to find a way to automate reboots without having to plug in keyboards and typing passwords on all servers.
USB Dongles?
This is a good first step. You have a USB drive with you and instead of typing in passwords on all servers you plug in the drive before booting and the system unlocks automatically or by pressing a button if you're using a yubikey.
Obvious flaws are:
- Sooner or later you're going to leave the USB drive somewhere and the system is useless
- Doesn't work for police raids as they will take all USB drives too
- Single point of failure, unless you make copies - then it's multiple points of "where's my other key"
Okay so what else could we do?
Obvious solution: Send decryption keys via the network
Hear me out, it might be less insane than you think.
All we need is one device that is hosting a NFS, SSH or HTTPS Server that is serving the keys and all servers have to have access to it.
Then we have to configure the servers to stay in a loop until this server can be reached to grab the key and decrypt the drives and start services depending on storage (like docker).
This means we have one computer that if powered on, will allow all servers to decrypt on boot. This computer obviously should be encrypted as well and should have a really good password. Unless you're a fan of "security by obscurity" then you might host the keys on a Raspberry Pi Zero that's hiding in a wall or hidden in another device like a coffee machine or - if you really trust your internet connection - can even be offsite.
Ok but that means I need to be physically there to boot this key serving device, right?
Ideally yes, but no!
You can remoteley decrypt a LUKS encrypted linux device using SSH! You can even use Google 2FA for this so you can SSH in remoteley to decrypt the device using 2fa
Another aproach would be to host the key server on a different location but this would mean if your internet is out you can't reboot your devices.
Enough talk, let's build an example: ZFS Server and Synology NAS
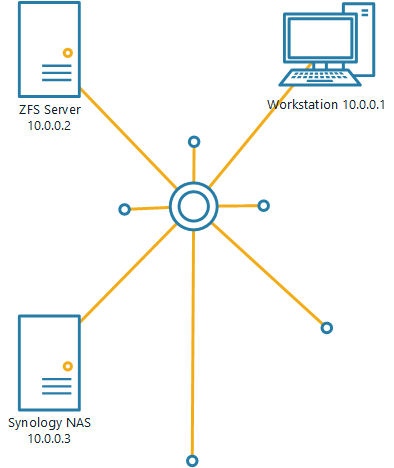
Let's consider a typical simple homelab that hosts 3 devices:
- A Workstation that will host the keys
- A Server with ZFS a storage pool
- A Synology NAS
Step 1: Set up the Workstation to serve keys
This setup assumes that your workstation uses full disk encryption (or some other security for your device) and it will work on all Operating systems.
Creating the keys
I use OpenSSL for this because it's installed on most linux distros.
mkdir ~/keys
cd ~/keys
openssl rand -out dataserver 512
openssl rand -out synology 128
This will create two files: dataserver and synology. Why is the synology key only 128 bytes? I'll explain later when we're setting up the synology encryption.
Serving these keys
On this step you can use your imagination. You can serve these keys in multiple ways
- Via a webserver
- Creating a new user and serving the keys from SSH
- Creating a NFS network share
For demo purposes I'll serve them via a python-builtin webserver but if you really want to serve keys via a webserver this you better set up a real web server that's not accessible from the internet and enforces HTTPS.
Run a local webserver using python (JUST FOR TESTING, DONT ACTUALLY SERVE YOUR KEYS USING UNENCRYPTED TRAFFIC)
cd ~/keys
python -m SimpleHTTPServer 8080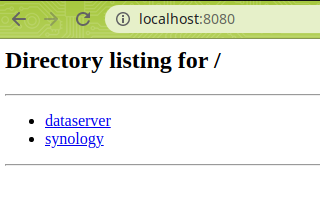
Step 2: Setting up the Synology NAS
The idea is:
- Creating an encrypted share using the GUI
- Getting SSH access and creating a simple script that will decrypt the share on reboot
- Making the decryption script run on boot
The Synology NAS has a few limitations when it comes to encryption. We can't use the binary key we created earlier and also we can't use more than 64 characters for the encryption key. But it's okay we'll use what we have.
Creating the share
First let's translate the key we created in step 1 to a "password" we can use
On the workstation run
cat ~/keys/synology | base64 -w 0 | tr -cd '[:alnum:]._-' | head -c 64This will do several things:
- base64 will create printable characters out of the binary key
- the "-w 0" will truncate the base64 output to one line
- the "tr .." command will remove any non-alphanumeric symbols (that are used by base64)
- "head -c 64" will use the first 64 characters of the resulting string
Copy and paste the output of the command (should be a 64 character long string) and use it as the passphrase when creating the encrypted share.
Auto decrypting on boot
First make sure you have enabled SSH access and can connect to the Synology NAS.
!! DO NOT DO THIS AS ROOT !! Not just is it not secure but also after your Synology NAS updates it wipes the root folder (ask me how I know..)
On the NAS: Create a script in your users home folder called decrypt.sh
#!/bin/sh

while ! wget -q --spider http://10.0.0.1:8080/synology; do
    echo "Waiting for network"
    sleep 5
done

key=$(curl --raw -s http://10.0.0.1:8080/synology | base64 -w 0 | tr -cd '[:alnum:]._-' | head -c 64)
synoshare --enc_mount "secureshare" $key
Then make a symlink to this script in /usr/local/etc/rc.d/ so it gets executed on boot.
chmod +x decrypt.sh
sudo ln -s /home/yourusername/decrypt.sh /usr/local/etc/rc.d/decrypt.sh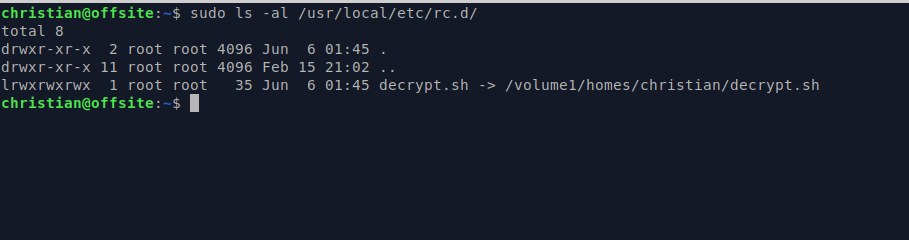
Awesome! Now your synology nas should automatically decrypt the share on boot if your webserver is running.
Step 3: Setting up your ZFS server
The idea is identical to the Synology part.
- Create a ZFS pool with encryption using our key
- Create a script that runs on boot and decrypts the pool
Important note
Alpine Linux does not load the aes-ni module by default. If your CPU supports the AES-ni flag (check ifgrep aes /proc/cpuinfo outputs something) you also need to load the aesni_intel kernel module by using modprobe aesni_intel (gone after reboot) or making it permanent echo 'aesni_intel' >> /etc/modules
Creating the encrypted dataset
For testing purposes we'll not use real hard disks but a 1G test block filesystem
cd /tmp/
truncate -s 1G block
sudo zpool create testpool /tmp/block
sudo zpool set feature@encryption=enabled testpool
curl -s http://10.0.0.1:8080/dataserver | base64 | sudo zfs create -o encryption=on -o keyformat=passphrase -o compression=on testpool/secure
The last command does the magic. It gets the key from our webserver, runs it through base64 and then pipes the results to the zfs create command which uses the piped key as passphrase. So from now on we can decrypt automatically
The decrypt.sh script
#!/bin/sh

while ! wget -q --spider http://10.0.0.1:8080/dataserver; do
    echo "Waiting for network"
    sleep 5
done

curl -s http://10.0.0.1:8080/dataserver | base64 | sudo zfs load-key testpool/secure && sudo zfs mount testpool/secure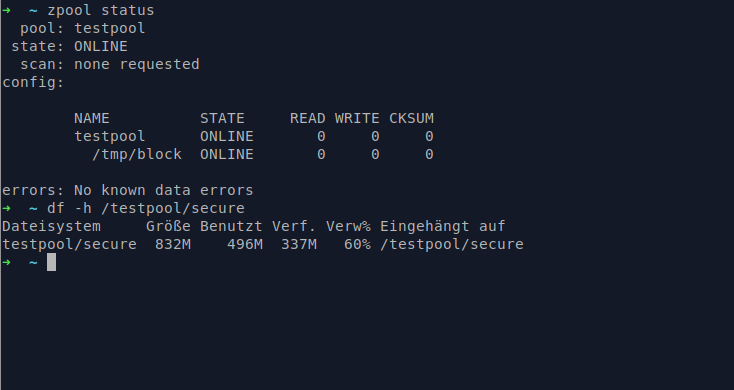
TL;DR
The idea is that you create encryption keys that get loaded over the network. Works for basically all encryption methods on linux and for Synology NAS devices. But it gives you a single point of failure (the key server) but that's kind of the idea. If that device is not running all your data will just be random noise.
Also if I had encrypted all my computers in 2014 when I was raided by the police because they followed a wrong lead, I would have gotten my computers much sooner than the 1 year it took them to look through all my files of all my harddrives

Comment using SSH! Info