Let's Encrypt is one of these services that seemed impossible just a few years ago. The first certificate I installed on a web server cost me about 60€ per year (for a single site).
A lot has changed since then and almost every website is now using HTTPS by default (thanks Snowden).
If you're a homelabber or a web dev you probably host a fair share of websites, some even under the same domain.
So far so good, what's the catch?
Did you know every certificate you request (both paid and free) gets published in a Certificate Transparency Report? This is an important security measure because every Certificate Authority (CA) can create a valid certificate for any website.
But this also means if you just create a certificate for a development site or some internal tool, everyone can see your domain in these reports.
So, absurdley this means that HTTPS sites are easier to enumerate than just HTTP sites.
There is a solution for this, right?
A good way to still have semi-safe subdomains is to use a Widcard Certificate.
Instead of creating certificates for plex.example.com, nextcloud.example.com and gitea.example.com you can request one certificate for *.example.com and use any subdomain with that one certificate.
How to get a wildcard cert from Let's Encrypt?
Since v2 of the ACME API wildcard certificates can be requested using a DNS-01 challenge.
I'll be using certbot for this exercise since it has a plugin that makes what we're about to do very easy.
There are multiple ways to use certbot to create a wildcard certificate, some are only semi-manual or require you to configure login credentials to your DNS provider but the method I'll be describing here is fully automatic and doesn't require any credentials or tokens stored in your config.
Also the machine requesting the wildcard cert does not need to be the target of the DNS wildcard records.
Requirements
For this to work you need
- A Server with a static IP or dynamic DNS already configured
- The ability to forward a port to this server
- The packages
apt-get install certbot python3-certbot-dns-standaloneor alternativeleypip3 install certbot certbot-dns-standalone
Forward port 53 (UDP) to the machine requesting the certificate and make sure there is not already a DNS server running, otherwise the wildcard request will obviously fail.
DNS Setup
Assuming the IP Address of your server is 1.2.3.4, set up these DNS records. If you have a dynDNS, you can skip the second record and instead use your dynDNS record instead of acme.example.com.
acme IN  A   1.2.3.4            # for domain acme.example.com pointing to your public ip
acme IN  NS  acme.example.com.  # the nameserver pointing to the machine executing the script
_acme-challenge  IN  CNAME  acme.example.com. # required _acme-challenge CNAME entry
Requesting the certificate
The Setup is finished, now we can request the certificate. This script will request one certificate that's good for example.com as well as *.example.com
#!/bin/bash
certbot --non-interactive --agree-tos --email youremail@example.com certonly \
  --preferred-challenges dns --authenticator certbot-dns-standalone:dns-standalone \
  --certbot-dns-standalone:dns-standalone-address=0.0.0.0 \
  --certbot-dns-standalone:dns-standalone-ipv6-address=:: \
  --certbot-dns-standalone:dns-standalone-port=53 \
-d example.com -d *.example.comAdd this script to a cronjob so the command is run once a month. This is the whole process, now you'll always have a fresh wildcart certificate for your domain.
Also you can and should extend this script to automatically deploy the new certificate to all your endpoints like web servers, firewalls, clusters, etc.
Where to go from here?
Now you have the ability to request a wildcard certificate without having to rely on external APIs (well.. except the one from Let's Encrypt) and you can easily extend the request script to push the certificates to another server (eg. a reverse proxy)
Making it work with Nginx Proxy Manager
My favorite reverse proxy software Nginx Proxy Manager sadly doesn't support this selfhosted DNS request out of the box, even though the maintainer sounded sympathetic in the beginning but then ignored me. But there is a way to still make it work.
First you need to request your first wildcard certificate like described above.
Then in Nginx Proxy Manager go to SSL Certificates -> Add SSL Certificate -> Custom.
Give it a name and upload the certificates from your certbot machine located in /etc/letsencrypt/live/example.com/.
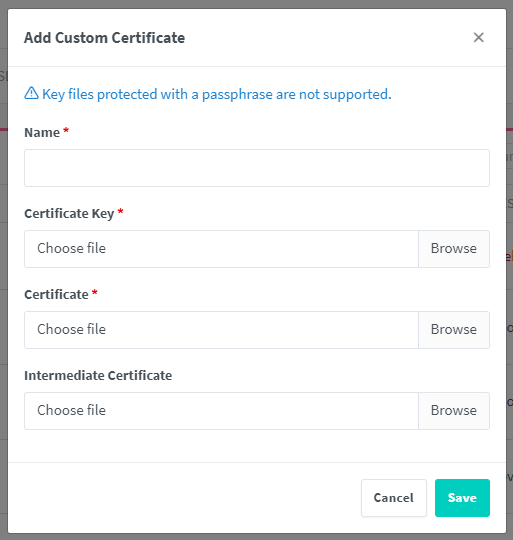
- Certificate key ->
privkey.pem - Certificate ->
fullchain.pem
This certificate will expire after 90 days and you probably don't want to manually update it every time. Luckily you don't have to. Just add these lines to your certbot request script:
cp /etc/letsencrypt/live/example.com/fullchain.pem /path/to/your/nginxproxymanager/data/custom_ssl/npm-14/fullchain.pem
cp /etc/letsencrypt/live/example.com/privkey.pem /path/to/your/nginxproxymanager/data/custom_ssl/npm-14/privkey.pem
The directory npm-14 will be different for you. Check your custom_ssl directory for the latest directory. Since nginxproxymanager reloads every few minutes, you don't need to restart anything to make it work.

Comment using SSH! Info