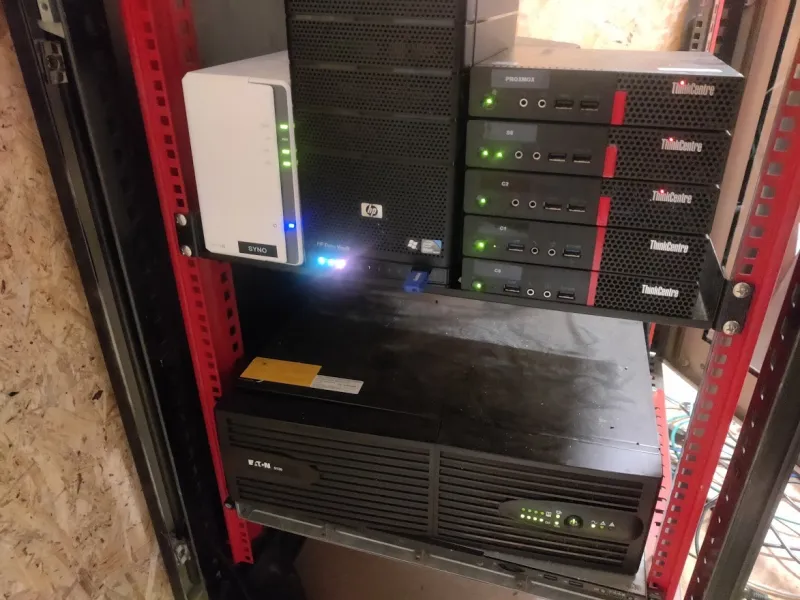
For almost a year now I have been using Proxmox as my main hypervisor in my homelab. When the electricity prices exploded here from 7 to 52 cents per kW/h I had to shut down my old and inefficient HP server and I bought a mixed bunch of Lenovo Tinies which in total consume less than 100W.

Half of them run on Alpine Linux in Docker swarm and the others run Proxmox clustered together. Only two of the Proxmox nodes have 10G ethernet and only one has room for more than one NVME drive.
Since my homelab has been growing I wanted to try remote storage. Using NFS or Samba with Proxmox works great but you don't get the snapshot feature which is only available when using ZFS.
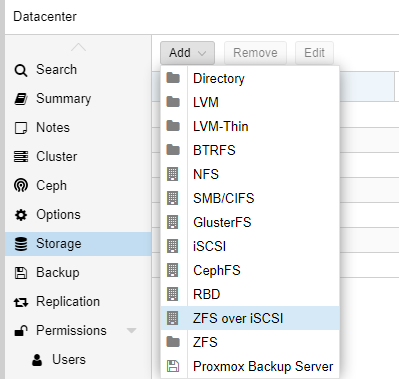
When adding storage to a Proxmox system there is this one menu entry which caught my attention called "ZFS over iSCSI"

This lead me to a google rabbithole to find out how to implement it. The official documentation only explains the proxmox part but not really how to set it up. So this post should be seen as a guide on how to set up a storage server that can be plugged in
Step 1: The hardware
For this to make sense our storage server should probably have fast disks and ideally a 10g network card.
I'll be using an old ThinkCentre M93p with an i7 4790 and installed this 60€ 10G SFP+ NIC.

Since this computer is too old to have an m.2 slot but I really wanted to use an NVME drive, I got myself a PCIE M.2 adapter and plugged my 2TB drive into it. Speeds were over 3 gigabytes per second and would therefore be more than enough for the 10G NIC.

Step 2: The fileserver setup
Even though I love Alpine linux and would have loved to use it for this project, I couldn't use it because of the (hardcoded) way proxmox talks to the ZFS storage which requires all zvols and pools to be acessible via /dev/poolname which Alpine doesn't do and I couldn't figure out how to make it work. If anyone knows, please let me know because I'd rather have this on Alpine Linux.
So I'm going to use good old Debian as the fileserver but I have also successfully tested it with Ubuntu 22 server.
Install ZFS & make a pool
Install zfs on Debian using apt install zfsutils-linux which will take a while because it's compiling zfs during the installation. If you can't find the package, make sure you are also getting the contrib and non-free repos in your /etc/apt/sources.list.
Create your zpool as you normally would. The magic will be done by Proxmox later.
My pool is called testpool for now.
zpool create testpool /dev/nvme0n1
root@datastore:~# zpool status
  pool: testpool
 state: ONLINE
config:

        NAME         STATE     READ WRITE CKSUM
        testpool        ONLINE       0     0     0
          nvme0n1p2  ONLINE       0     0     0

errors: No known data errors
Install the ISCSI Server
We'll be using targetcli for configuring the iSCSI server. I'll just explain the commands needed for setting it up to work with Proxmox, if you want a more in-depth tutorial on how to use targetcli check out a guide like this
apt -y install targetcli-fb
Then run targetcli which is a menu-like system for managing the iSCSCI configuration.
The first command you want to enter is ls to see the whole config tree
root@debiantest:~# targetcli
Warning: Could not load preferences file /root/.targetcli/prefs.bin.
targetcli shell version 2.1.53
Copyright 2011-2013 by Datera, Inc and others.
For help on commands, type 'help'.

/> ls
o- / ............................................................................................................. [...]
  o- backstores .................................................................................................. [...]
  | o- block ...................................................................................... [Storage Objects: 0]
  | o- fileio ..................................................................................... [Storage Objects: 0]
  | o- pscsi ...................................................................................... [Storage Objects: 0]
  | o- ramdisk .................................................................................... [Storage Objects: 0]
  o- iscsi ................................................................................................ [Targets: 0]
  o- loopback ............................................................................................. [Targets: 0]
  o- vhost ................................................................................................ [Targets: 0]
  o- xen-pvscsi ........................................................................................... [Targets: 0]
/>
We only want to create a target and make sure proxmox can access it. We don't need any backstores (which would usually be your disks or pools) because Proxmox will handle that all for us.
Enter the command /iscsi create to create the target and group, then run ls again to see if the target and targetgroup have been created.
/> /iscsi create
Created target iqn.2003-01.org.linux-iscsi.debiantest.x8664:sn.32710fbcc8b9.
Created TPG 1.
Global pref auto_add_default_portal=true
Created default portal listening on all IPs (0.0.0.0), port 3260.
/> ls
o- / ............................................................................................................. [...]
  o- backstores .................................................................................................. [...]
  | o- block ...................................................................................... [Storage Objects: 0]
  | o- fileio ..................................................................................... [Storage Objects: 0]
  | o- pscsi ...................................................................................... [Storage Objects: 0]
  | o- ramdisk .................................................................................... [Storage Objects: 0]
  o- iscsi ................................................................................................ [Targets: 1]
  | o- iqn.2003-01.org.linux-iscsi.debiantest.x8664:sn.32710fbcc8b9 .......................................... [TPGs: 1]
  |   o- tpg1 ................................................................................... [no-gen-acls, no-auth]
  |     o- acls .............................................................................................. [ACLs: 0]
  |     o- luns .............................................................................................. [LUNs: 0]
  |     o- portals ........................................................................................ [Portals: 1]
  |       o- 0.0.0.0:3260 ......................................................................................... [OK]
  o- loopback ............................................................................................. [Targets: 0]
  o- vhost ................................................................................................ [Targets: 0]
  o- xen-pvscsi ........................................................................................... [Targets: 0]
/>
We're almost done. We only have to make sure Proxmox can actually write to the LUNs. For that you need to move into your target tree and group which in my case is done using cd /iscsi/iqn.2003-01.org.linux-iscsi.debiantest.x8664:sn.32710fbcc8b9/tgp1 and then run the following command to disable authentication (we're in a homelab afterall)
set attribute authentication=0 demo_mode_write_protect=0 generate_node_acls=1 cache_dynamic_acls=1Which should return something like this
/> cd /iscsi/iqn.2003-01.org.linux-iscsi.debiantest.x8664:sn.32710fbcc8b9/tpg1/
/iscsi/iqn.20...0fbcc8b9/tpg1> set attribute authentication=0 demo_mode_write_protect=0 generate_node_acls=1 cache_dynamic_acls=1
Parameter authentication is now '0'.
Parameter demo_mode_write_protect is now '0'.
Parameter generate_node_acls is now '1'.
Parameter cache_dynamic_acls is now '1'.
To lean more about ACLs and authentcation in iSCSI, check out this Arch wiki guide
That was it! Run the exit command which will also save the configuration and you're all set.
Step 3: Preparing Proxmox
Before we can add the new storage server to proxmox we need to create a SSH key that proxmox will use to log into the dataserver to set up the volumes.
Taking the example from the Proxmox wiki, where the IP address has to be the IP of your storage server. Basically you have to generate an SSH key that proxmox will use to SSH as root into the data server.
These commands should be run from your Proxmox server.
mkdir /etc/pve/priv/zfs
ssh-keygen -f /etc/pve/priv/zfs/192.168.5.99_id_rsa
ssh-copy-id -i /etc/pve/priv/zfs/192.168.5.99_id_rsa.pub root@192.168.5.99
ssh -i /etc/pve/priv/zfs/192.168.5.99_id_rsa root@192.168.5.99
If you have multiple nodes in your cluster you only have to do this once but all nodes have to know the key so you'll have to run ssh -i /etc/pve/priv/zfs/192.0.2.1_id_rsa root@192.0.2.1 on all nodes of your cluster once.
Step 4: Adding the storage to proxmox
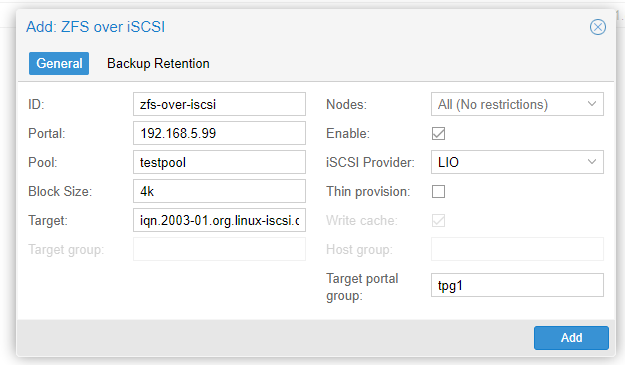
Now all that's left to do is adding the storage to proxmox. Go to Datacenter -> Storage -> Add -> ZFS over iSCSI

Settings explanation
| Setting | What is it | My values |
|---|---|---|
| ID | The name of the storage in Proxmox | zfs-over-iscsi |
| Portal | The IP or hostname of the iSCSI server | 192.168.5.99 |
| Pool | The name of the ZFS pool on the server | testpool |
| Block Size | iSCSI block size | 4k |
| Target | The "target" generated by targetcli | iqn.200[..]10fbcc8b9 |
| Nodes | You can limit this storage provider to just some of your nodes if you like | All |
| iSCSI Provider | This should be set for "LIO" (Linux IO) if you're using "targetcli" | LIO |
| Thin provision | VMs will take up only as much space as they'll actually use. If not checked, a 32gig VM disk will always take up the full 32gigs | Unchecked |
| Target portal group | The group generated by the "create" command. Will usually be tpg1, check targetcli ls if not sure |
tpg1 |
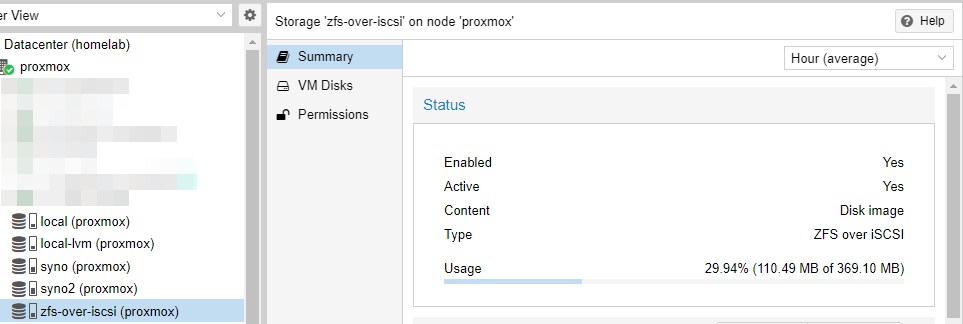
After adding it you should be able to select the new storage system and see it as "Active"

Congratulations now you can use your new data store for VMs. You can even move existing disks to the new ZFS over iSCSI storage backend and create snapshots as you could with a local ZFS drive.

Comment using SSH! Info

